Tutorials

Thursday, March 26, 2015

AM SO LAZY


I  don't know if it's me, or it happens to everybody, I just realize I have so many unfinished projects, this is caused by a lot of factors, ranging from lack of time, difficulty in the techniques involved, and this thing of having to keep repeating one step over and over again…very boring.


TUBULAR PEYOTE:

This one is tubular peyote, which I started like two weeks ago, I plan to make it into a necklace, the design is made with size 2 seed bead, I so much love the way I use the multicolour beads to make a rhombus shape around the beadwork.

AFICAN HELIX:

This traditional African stitch closely resemble a DNA , one characteristic of the African  helix are the raised beads called "piping", the piping creates the design for the African Helix stitch, you use a different colour of bead for the piping and it will create that spiraling effect on the beadwork.

You can either use seed beads throughout or you use seed bead and bugle bead. For this particular one I use size 1 seed bead and bugle bead, I use the seed bead for the piping.

click here for African Helix tutorial

CELLINI SPIRAL:

Cellini spiral is a variation of tubular peyote, where different size and colour of beads are used to create the spiral effect, for this particular one,  I use two different shades of blue and pink colour, I so much love  the colours and the spiral effect, it looks like a snail shell.

It's taking me eternity to finish my Cellini spiral, have abandoned it for more than six months, I just can't wait to finish it.

RAW CHAIN LINKS:

Am seriously tired of this design, and I really want to finish, so I can show off my hard work, have abandoned it for like three months now, I don't mind if someone can help me out on this.

I made multicoloured tubular right angle weave (RAW), and stitched the ends together to form a ring, I have eleven (11) rings right now, I think I need like seven (7) more. I hope to make a bracelet out of this particular stitch, but I have to finish this one first.


I know I may not be an expert, but I like to share what I can do.

What's that stitch that's been giving you tough time?


Tutorial: African Helix


Hi Friends:
I prepared this tutorial based on a request. You really have to forgive me, I won’t be posting any pictures,  I hope you will make do with only the written instructions, trust me, it’s very simple if you follow it closely.
You can either use seed bead and bugle beads, or you use seed beads throughout, if you want to use seed beads only, you will need two colours of seed bead,  all you just have to do is to substitute the bugle bead for seed beads,  like 3-4 seed beads.

Materials: 
1. Size 1 seed bead. 
2. Bugle bead.
3. 0.25 fish line.
4.  Bead needle.


Procedure:
1. Insert a needle to a comfortable length of fish line.
2. Insert one seed bead and one bugle bead, three times simultaneously, slide them down to the end of the fishing line, leaving about six inch tail.
3. Stitch through all the beads to form a triangle shape, your fishing line should exit from a seed bead.
4. Pick a seed bead and a bugle bead.
5. Pass the needle into the nearest seed bead in the triangle.
6. Repeat from step four (4).
Note: You can gently push the beadwork into a tubular shape, make sure you are stitching your needle through the raised seed bead.


Feel free to share your finished project on my facebook page, @beadglitz ng.


                                Happy beading,
                                     Tomisin. 

Tuesday, March 17, 2015

WISH UPON A STAR (TUTORIAL)


"When you wish upon a star your dreams come true"
The saying comes from the belief, when you see a shooting star in the sky at night, any wish you make would be granted. Sounds very  funny,  lol....

"When you wish upon a star
 Make no difference who you are
 anything your heart desires
 Will come to you.

 If your heart is in your dream 
 No request is too extreme
 When you wish upon a star
 As dreamers do."
                    Leighton Harline,  Ned Washington. 

Fellow beaders, 
       A dream is a wish your heart makes, and every wish is a prayer and a direct flash of positive thinking. So don't hesitate to wish and pray for something positive today, because that shooting star might just be your lucky star.

Back to business, lol.....

today I wish to make a beaded star.

Beaded stars are fun to make and it's very easy,  you can use them as earrings, pendants,  charms, key chain ornament, you can even string them together to make a bracelet or necklace. 

Bellow are the materials we will need to make a beaded star.


1.  Size 3 seed bead.
2.  0.30/0.35 fishing line.
3.  Beading needle.
4.  Scissor

Procedure:
1. Thread a needle to a comfortable length of fishing line.
2. Pick up 10 seed beads
3. Stitch through them to form a circular shape at the end of the fishing line, leaving about a 6 inch tail. 

4. pick up 5 seed beads, skip a bead in the ring, then stitch your needle through the next bead, it will form a loop.


5. Repeat step 4 all the way round.

6.  Stitch up through 2 beads At the first loop.

7.  skip the third bead in that loop and go through the remaining 2, this will make Your star tip stand out more sharply.

8. Go through the bead in the main ring, and repeat step 6 and 7 for the remaining loops.
9. secure both fishing line and cut.

hope you've enjoyed this, Do come back to see more from me.

Make your's today and share with me. 
                                                    Tomisin.

Friday, March 13, 2015

TUTORIAL: NETTING STITCH


Hi Friends, 
We Will be learning Netting stitch for a simple necklace design. 
     Netting stitch is a simple bead weaving technique,  it owes it origin to the fishing net weaving.

     Just like with peyote and right angle weave, netting is a versatile stitch, it can be used in so many ways, with different bead counts, and embellishing different type of beads in various shape and sizes to create new effect.

For this simple Necklace we would need:
Size 3 seed bead                A
Size 6 crystal bead            B
Size 1 seed bead                C
0.35 fishline 
bead needle

       You can get all the beading supplies at any bead shop near you.

PROCEDURE:
1.  secure a stop bead and a needle to a comfortable length of fish line.
2. string the first bead sequence; 
10 A beads, 1 B bead, 4 A bead, 1 B bead, 1 C bead.

3.  then stitch up the needle through the crystal bead before the C bead and pull snug.
4.  pick; 4 A bead, 1 B bead, 4 A bead
5.  Stitch up through the first crystal bead on the first  sequence, to form a diamond shape. 

6. Pick; 3 A bead, 1 B bead, 4 A bead. 
7.  Stitch down through the middle crystal  on the diamond shape.

8.  Pick; 4 A bead, 1 B bead, 1 C bead
9. repeat from step 3 till you get your desired length

10. Pick 10 A bead, and attach your clasp .


     I found some beautiful seed bead netting patterns  over at BEADS MAGIC, the website has a lot of free bead patterns. 
check out these inspiring necklaces and free pattern, If you need more, visit  beadsmagic 


    let's see you try your hands on these project, you may just end up making one for your mum, for the fourth coming mother's day

Hope you've enjoyed this, do come back to see more from me. 
                                   Stay creative......
                                           Tomisin. 

NECKPIECE NEEDS A NAME

Hey guys, 
      I guess you all are preparing for a awesome weekend, mine have started already. Have been so lazy this week, no blog update,am so sorry,  I do hope you will forgive me for this.
    Despite my laziness,  I was able to make this awesome neckpiece,  which is my favourite creation right now, and am definitely keeping this one for myself, lol.....*winks. The problem is, this beautiful Work of art, doesn't have a name, can you please suggest a name for my beautiful neckpiece? lol....I will be awaiting your suggestions at the comment section. 


                                                     Stay creative......
                                                         Tomisin

Friday, March 6, 2015

BEADED OBJECT: BROOCH


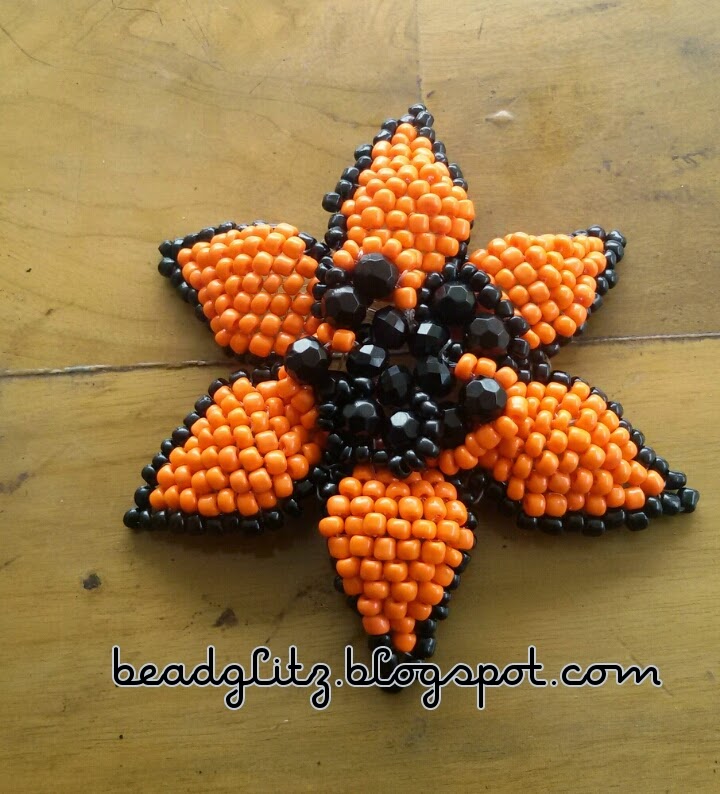
Am super excited at the outcome of this project, this project is my first attempt on brick stitch, and I was able to come up with this lovely six pointed star brooch, it look kind of difficult to make, but I will tell you, brick stitch is one of the easiest stitch to make.
You can use this brooch to accessories your multi strand necklaces, you can also you it as a hair pin, and you can also pin it on your cloth.


Bead pattern: Brooch.
Bead technique used: Brick stitch.
Bead type: seed bead and crystal. 

Do you know how to make a brick stitch?
What lovely pattern can you make with  brick stitch? 
In what other ways can this brooch be used? 


Don't forget to share your finished project.
cheers....
Tomisin.

BEFORE ANYTHING ELSE


Before you begin your journey in the beading world, you need to gather some basic tools and supplies, you will need to know what tools are required,and  what supplies are required.

 Here is a list of the basic supplies you will need for your bead project:

1. Round nose plier: 

     Used for making wire loops.

2. Flat nose plier:

      It's used for setting jump rings.

3. Wire cutter.

4. Beading thread or fish line:

       It comes in different sizes of thickness.

5. Beading needle.

6. Ear wires.

7. Clasps.

8. Headpins: 

    Headpin is use in making earrings.

9. Eyepins

10. Ruler or tape measure.

11. Adhesive like UHU, E-6000, and super glue.

12. Scissors.

13. Memory wire:

       Is an extremely hard, coiled wire that does not lose it shape, in comes in different sizes for bracelet. 
14.  Beads:
        It comes in all shapes, and sizes in many different colour

You can get all these beading supplies at any bead store near you


Thursday, March 5, 2015

TUTORIAL: BEADED FUR


Dear friends,

 The feedback I got as regards to my BEADED FUR project was very awesome, thank you all for your love and support, I love you all and I wish you the best in your beading journey. Have been receiving different calls and messages on watsapp, about me doing a tutorial on BEADED FUR by Svetlana Mcdaniel, here is a link to his youtube video on the project.
https://m.youtube.com/watch?v=Y-jxgWxmlqc

Here is a written tutorial with pictures, I do hope I will not end up confusing you the more. 


MATERIALS:

1. Size 1 seed bead in two colours (yellow and blue).

I will refer to yellow as A and Blue as B.

2. 0.30 Fishing line.

3. Needle (size 12).

You can find all the bead materials and supplies at any bead shop near you.

PROCEDURE:

1. Attach a needle to a comfortable length of fishing line.

2. Pick up twelve A bead , slide them down to the end of the fish line, leaving about a 6 inch tail, tie to form a circle.

3. Pick up five (5) B bead, and pass your needle through the A bead the fishing line comes out from to make a ring, pull snug.
 

4. Pass your needle into the next A bead, string 5 B bead and pass your needle through the A bead the fishing line comes out from to make a ring, like you did in step 3.

5. Repeat step 4 two more times.


6. Pick 3 A bead, and stitch through the A bead in between the next ring.

7. Repeat step 6 three more times.

Note: step up, by passing your needle out through the second  (3A) bead added in step 6.

Gently push your bead work into a tube shape.


8. Pick up 5 B bead and pass your needle through the A bead the fishing line comes out from to make a ring, like you did in step 3.

9. Pick 3 A bead and pass your needle into the 2nd bead of the previous  3B bead.

10. Repeat step 8.

11. Keep repeating step 9 and 8, over and over till it reach your desired length.

NOTE: the counting of the B bead can increase or decrease, it depends on how you want your beadwork to look like.

Feel free to share your finish project with me.

Watsapp number: 07031905046

Bbm pin:53395AA2

Facebook: Oloruntogbe Oluwatomisin


                                                 Yours in beading,

                                                            Tomisin

Tuesday, March 3, 2015

BEADED BALLS

Beaded balls are always fun to make, they are also very beautiful, you can use them as charms, earrings or pendants,  you can even string them together to make a bracelet or necklace, it can also be use to beautify another kind of stitch.
Here are few samples of necklaces made with beaded balls.


Do you know how to make beaded balls? 
 Feel free to share your designs with me.
Facebook: Oloruntogbe Oluwatomisin
Twitter: @dim_plecheek


Monday, March 2, 2015

TUTORIAL: flat spiral

Dear Friends,

We will be learning flat spiral stitch today,  

Flat spiral stitch is a flat variation of spiral rope, if you are familiar with spiral rope, then you won't find this stitch difficult.

To make a flat spiral stitch you will need 
1. Size 8 crystal bead.
2. Size 1 seed bead. 
3. Size 4 bicone bead.
4. 0.25 Or 0.30 fish line.
5. Beading needle, Size 12 would be preferable

You can find all beads and supplies at any bead shop near you.

 PROCEDURE:
1. Cut a comfortable length of beading thread (fish line), and attach your needle and a stop bead.

2. Pick up two (2) crystals, three (3) seed beads, one (1) bicone bead, and three (3) seed beads.

3. Stitch up through the two crystal beads, which are your core bead, the seed beads and the bicone bead would form a loop around the core bead, push the loop to the right of the core bead.


4. Pick up three (3) seed beads, one (1) bicone bead, three(3) seed beads, and stitch up through the two core bead again, push this new loop to the left of the core bead.


5. Pick up one(1) core bead, three (3) seed beads  one(1) bicone bead  and three (3) seed beads, stitch up through the last core bead and continue through the new core bead picked up in this step, push this new loop of beads the right , let it rest on the top of the previous right-hand loop.


6. Repeat step 4.

7. Repeat step 5 & 4 until you have your desired length.
8. Remove the stop bead from the tail and attach your clasp. 


Feel free to share your finish project with me.

Watsapp number: 07031905046

Bbm pin:53395AA2

Facebook: Oloruntogbe Oluwatomisin


                                              Your's in beading,
                                                    Tomisin.